

If you’re throwing away your onion skins, carrot peels, and celery ends, I’m here to tell you one of my favorite kitchen secrets: you’re throwing away free flavor.
Welcome to the ultimate Recipycle hack! Learning how to make vegetable broth from kitchen scraps is, in my opinion, the easiest and most rewarding way to start a zero-waste kitchen. You’re taking items you’d otherwise discard and turning them into a delicious, nutrient-dense “liquid gold” that costs literally nothing.
It tastes infinitely better than most store-bought options, and you get full control over the ingredients (especially the salt!). This simple process will change the way you cook.
Quick Summary: Key Takeaways
For those in a hurry, here’s the rundown:
- Save the Right Scraps: Keep a bag in your freezer for onion skins, carrot peels, celery ends, mushroom stems, and herb stalks.
- Avoid the Wrong Scraps: Do not use starchy (potato peels) or cruciferous (broccoli, cabbage, cauliflower) scraps, as they will make your broth bitter and cloudy.
- Simmer, Don’t Boil: Gently simmer your scraps with water, peppercorns, and a bay leaf for about 1-2 hours. Boiling can make it bitter.
- Strain & Store: Strain the broth and store it in the fridge for up to 1 week or in the freezer for 6 months.
Why You Should Be Making Scrap Broth
Here at Recipycle, our goal is to find value in what others discard. This vegetable scrap stock is the perfect example.
- It’s Completely Free: You were already buying the vegetables. The scraps are a “byproduct.” This broth is a 100% free bonus.
- It Reduces Food Waste: This is the core of our philosophy. Every bit of food you save from the compost or trash is a win for your wallet and the planet. The U.S. Environmental Protection Agency (EPA) notes that food is the single largest category of material placed in municipal landfills. This practice is a direct, easy way to combat that.
- It’s More Flavorful & Healthier: You control the flavor. No more weak, overly-salty broth. You also get all the vitamins and minerals that are hiding in those peels and skins.
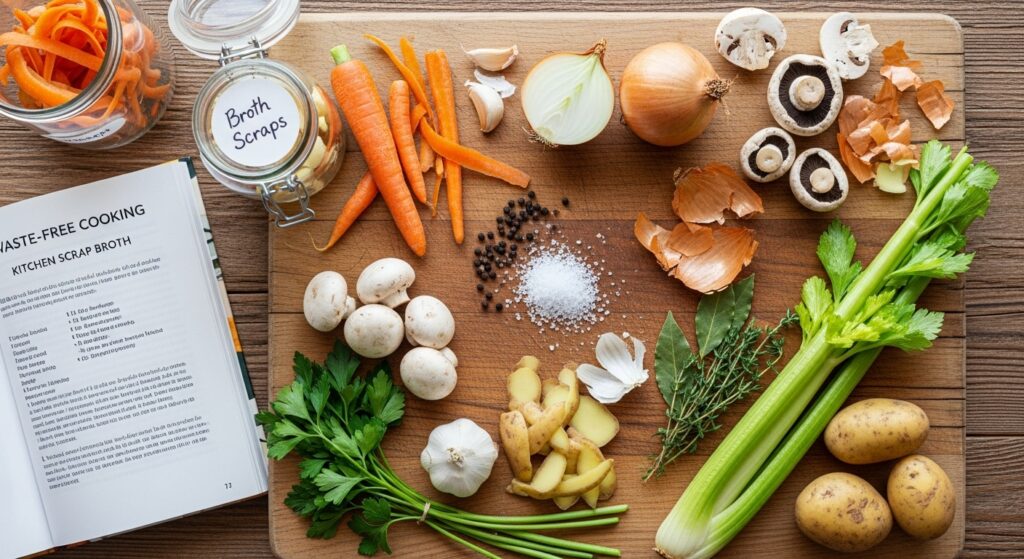
The “Scrap Bag” System: What to Save & What to Avoid
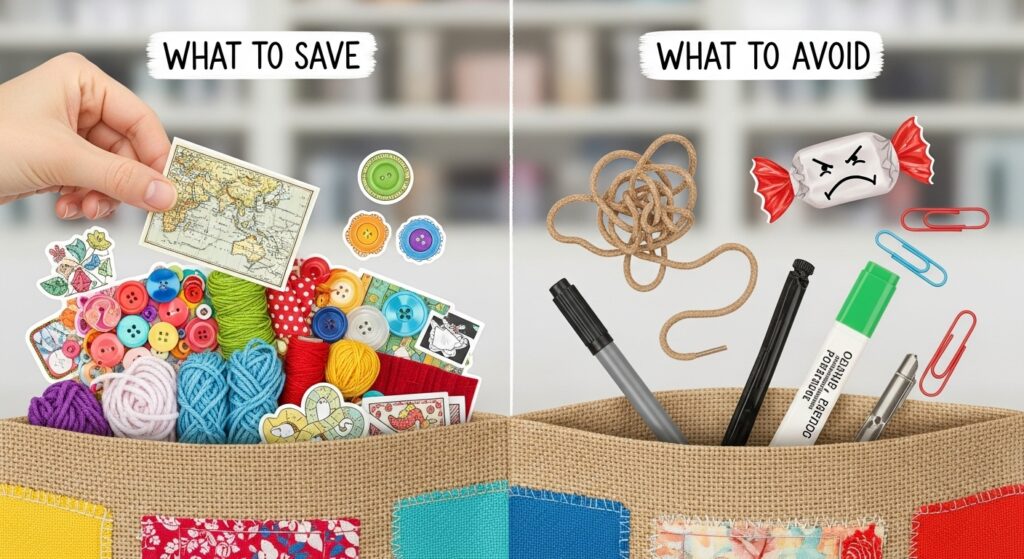
This is the most important part of the process. A good broth starts with good scraps.
In my kitchen, I keep a dedicated bag right in the freezer. Every time I prep veggies, the “good” scraps go straight into the bag. Once it’s full (usually 4-6 cups), it’s broth time!
Suggested placement: Here, to visually explain the “Scrap Bag” system.
✅ The “YES” List: Scraps to Save
These scraps build a sweet, savory, and well-rounded flavor base.
- Onion Skins & Ends: Yellow and red onion skins are my secret weapon! They give your broth a beautiful, deep golden color. Shallot and leek greens (washed well!) are also fantastic.
- Carrot Peels & Ends: Adds a mild sweetness.
- Celery Ends & Leaves: The classic aromatic base. Don’t use too many leaves, as they can be a bit strong, but the ends are perfect.
- Mushroom Stems: Adds a deep, savory, umami flavor.
- Herb Stems: Parsley and thyme stems are my go-to. (Avoid very strong herbs like rosemary or sage unless you want that specific flavor).
- Garlic Skins & Ends: Adds a gentle aromatic flavor.
- Bell Pepper Cores & Ends: (Use in moderation) A little bit adds a nice sweetness.
❌ The “NO” List: Scraps to AVOID at All Costs
I’ve learned this the hard way: adding the wrong scraps will ruin your entire batch. These ingredients will make your broth bitter, cloudy, or just plain weird.
- Cruciferous Vegetables: This is the #1 rule. NO broccoli, cauliflower, cabbage, kale, or Brussels sprouts. They release sulfurous compounds and will make your broth unpleasantly bitter.
- Starchy Vegetables: NO potato peels or sweet potato peels. They will make your broth cloudy, gummy, and starchy.
- Zucchini or Squash: These break down into mush and create a cloudy, off-tasting broth.
- Rotten or Moldy Scraps: This should go without saying, but only use clean, fresh scraps you would otherwise eat. If it’s slimy or moldy, it goes to the compost.
How to Make Vegetable Broth from Kitchen Scraps
Once your freezer bag is full, you’re ready to go. It takes about 10 minutes of active prep and 1-2 hours of simmering.
Ingredients
- 4-6 cups (1 large freezer bag) of frozen vegetable scraps
- 8-10 cups of Cold Water (or enough to just cover the scraps)
- 1-2 Bay Leaves
- 1 teaspoon Whole Black Peppercorns
- A handful of fresh Parsley Stems (optional, but recommended)
- Pinch of Salt (optional, I prefer to leave it unsalted and salt the final dish)
Step-by-Step Instructions (Stovetop Method)
- Combine Ingredients: Place your frozen vegetable scraps directly into a large pot or Dutch oven. No need to thaw!
- Add Aromatics & Water: Add the bay leaves, peppercorns, and parsley stems. Pour in enough cold water to just cover the scraps. Using cold water helps extract flavor more slowly and evenly.
- Bring to a Simmer: Place the pot on the stove over medium-high heat. Bring it just to a boil, then immediately turn the heat down to low.
- Simmer Gently (Don’t Boil!): This is a key pro-tip. You want a gentle simmer, with just a few bubbles breaking the surface. Boiling the broth can make it bitter and cloudy. Let it simmer for 1 to 2 hours. Unlike meat broth, vegetable scraps release their flavor quickly. Simmering for longer can actually make it taste “stewed” and bitter.
- Strain Completely: Place a fine-mesh sieve over a large bowl. For an extra-clear broth, I recommend lining the sieve with a layer of reusable cheesecloth. Pour the broth and scraps through the sieve.
- Press for Flavor (Gently): Use the back of a spoon to gently press on the scraps to release any trapped liquid. Don’t press too hard, or you might push bitter flavors or cloudiness into your stock.
- Compost & Cool: Discard the spent scraps (they’ve given their all!) to your compost bin. Let the broth cool to room temperature before storing.
Suggested placement: Here, in the “Strain Completely” step.
Pro-Tip: Slow Cooker or Instant Pot
- Slow Cooker: Add all ingredients to your slow cooker. Cook on LOW for 6-8 hours. Strain as usual.
- Instant Pot / Pressure Cooker: Add all ingredients. Cook on HIGH pressure for 30-40 minutes, then let the pressure release naturally. Strain as usual.
How to Store Your Liquid Gold
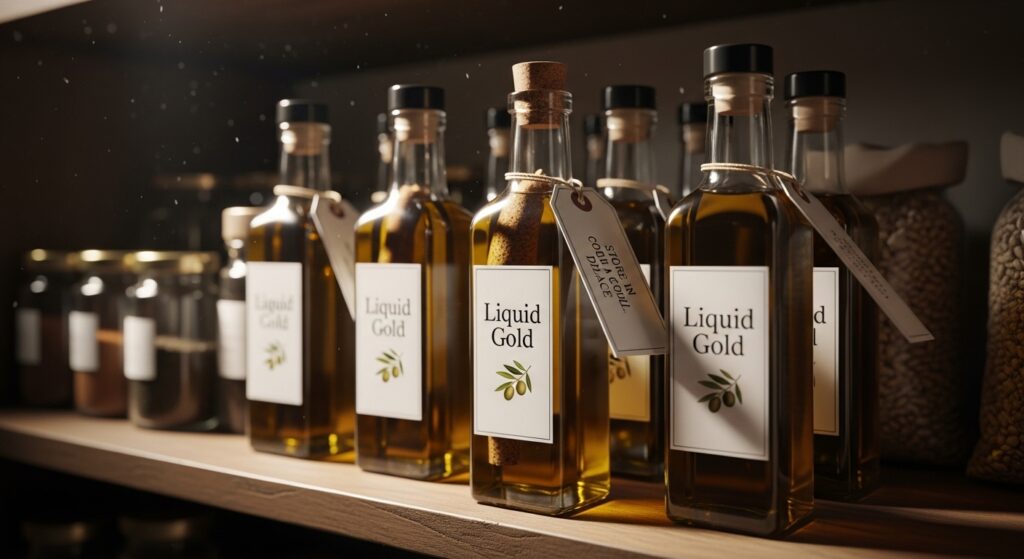
Your beautiful, homemade scrap broth is precious! Here’s how to keep it.
- In the Refrigerator: Store in an airtight jar or container for up to 1 week.
- In the Freezer: This is my preferred method. It lasts for at least 6 months.
- Jars: Pour into freezer-safe glass jars, making sure to leave at least 1 inch of headspace at the top to allow for expansion (otherwise, the jar will crack!).
- Bags: Pour into freezer-safe zip-top bags and lay them flat. Once frozen, you can “file” them upright to save space.
- Ice Cube Trays: Freeze the broth in ice cube trays. Once solid, pop the cubes into a freezer bag. This is perfect for when you just need a splash of broth to deglaze a pan or thin out a sauce.
This broth is the perfect base for any soup, stew, or risotto (like our It’s a simple, powerful way to embrace the Recipycle philosophy and a cornerstone of Easy Zero-Waste Kitchen Hacks
Frequently Asked Questions
1. Why is my vegetable scrap broth bitter?
This is the most common problem! It’s almost always one of two things: you used cruciferous scraps (like broccoli or cabbage) or you boiled it too hard for too long. Stick to the “YES” list and a gentle simmer, and you’ll be golden.
2. Do I need to wash my vegetable scraps before freezing?
Yes! I recommend giving all your vegetables a good wash before you peel or chop them. That way, the peels and ends are clean and ready for the freezer bag without any extra steps.
3. Why isn’t my broth dark or golden?
The color comes almost entirely from onion skins. If you want a deep, rich, golden-brown broth, make sure your scrap bag is at least 50% yellow or red onion skins. If you use mostly light-colored scraps (celery, potato peels which you shouldn’t use anyway), your broth will be very pale.
4. Can I add salt to my scrap broth?
You can, but I strongly recommend making it unsalted. This gives you a pure, neutral base. You can then salt the final dish (like your soup or stew) perfectly. If you salt the broth now, it might become too salty when you cook with it later.
Conclusion: Your Turn to Recipycle!
You are now officially a zero-waste kitchen champion. You’ve unlocked the secret to making delicious, flavorful, and free vegetable broth from ingredients you used to throw away. It’s a small change in habit that has a huge impact.
I’d love to hear how it goes! Leave a comment below and let me know your favorite combinations of scraps or what you plan to make with your first batch of liquid gold!